


I'm totally behind the eight ball as most of you have already seen it featured on several other blogs. I'm FINALLY getting it posted here on my blog. I entered this party in the "Most Adorable Kids Party 2009" over at Creative Hostess on a whim. I thought "why not". So I sent her a few pictures and the rest is history. The response has been overwhelming!
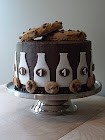
This party was a lot of fun to put together. I should also say this party was a lot of fun to put on, as in "put on" a few pounds. I not only made the cake, but all the cookies too - about 30 dozen to be exact. I HAD to sample everything I made - both in dough form and finished product. Quality control is a tough job; I wouldn't want anyone else to have to do it. Well, I didn't make the Oreo's, but still had to insure they were ok to eat!


The party details:
-invitations: I used a package of plain brown cards and put my own decorations on. The "cookies" I made by drawing chocolate chips with a brown marker and then tracing them with a sharper outline with a Sharpie on natural color cardstock. Then I crinkled the paper over and over again. Really mash it up! Then open and glue. The milk glass was a piece of tracing paper, a little piece of ribbon for the straw and finally a piece of acetate cut larger than the tissue. I rounded the edges for the look of a glass and added a few lines with a black Sharpie to try and show reflection. I was really pleased with how they turned out. The actual invite (inside) was laid out on the computer, printed, trimmed and taped inside.
-signage: the sign at the front door as well as the one on the highchair were a special find. It was a kit (by Bride's) that I found in the clearance bin at Michael's. I only spent $2.50 and look at the impact. The original purpose of the kit was name tags for chairs, i.e. the bride, the groom. Don't always take the instructions literally. I changed it up and it worked beautifully. The kit came with instructions on how to print on your own printer at home. For a couple bucks, I loved it!
-pom poms: You see these pom poms everywhere now. Martha Stewart sells a kit at Michael's that is very easy to use. Unfortunately, they didn't come in colors I needed so I just made my own with brown, white and cream tissue paper I found at various stores. I used the same ribbon to hang the pom-poms as I used to wrap the cookie jars. Its details like that which make an event very cohesive.
-bottles: My original inspiration for this party came when I was rummaging through my grandparents garage, attic and basement. They have saved everything! They had a plethora of old milk bottles, many of which were their actual bottles they had milk delivered in. How cool is that!? Some bottles I used as vases for flowers next to the cake. I hadn't planned on flowers, but when I saw a package of brown and white flowers at BJ's, I knew it was meant to be. What a happy accident! That my friends is sweet serendipity! Other milk bottles I used as, well, milk bottles! Where I was deficient, I bought flip-top bottles from Ikea. Since I want you all to learn from my mistakes and have an even better party, make sure you laminate the tags that go on the milk bottles - and the ice, water and tea in my case. At first everything was fine, but as soon as the condensation started, the labels started to bleed. Midway through the party, they were looking pretty rough. The favor bottles were re-purposed Frappacino bottles. I washed them and removed the labels. The lids were kind of tricky to get completely clean - some elbow grease needed for sure. I printed new labels for both the side and lid. I used 1% milk for 1st birthday - get it!? I also used the bigger side label to thank the guests for coming. Attached to the bottles were little bags of cookies and a brown and white pattern straw. The straws were again one of those happy accidents. I found them in the clearance bin - four for $1 at Joann Fabrics.
-cup tags: Since so many children (and forgetful adults - including myself!) were going to be at the party, I wanted to enable everyone to keep track of their drinks. I printed a sepia-toned photo of the birthday girl on natural color cardstock. I attached the pictures with bakers twine. Its function as well as another cute, affordable detail.
-birthday hat: I really wanted Aubrey to have a cute little hat to match her outfit. I started with a leftover hat from a friend's birthday party. Again, in an effort to keep the party cohesive, I used leftover paper and ribbon from the cookies jars. The "ruffled" ribbon on the bottom of the hat was just loops hot glued close together. I hand lettered the words on with marker and then outlined in Sharpie.
-white everything: Whenever possible, I try to buy any entertaining pieces in white. Not only does food look best on white, but white pieces can easily be incorporated into any decor. I just add color, in this case ribbon, which makes it look like I bought it just for that event. Case in point, I have a matching set from Pottery Barn (on sale way back when) of a white ice bucket and white utensil holder. I couldn't tell you how many times I have thrown coordinating ribbon on those two things to add another small detail to the overall look. You can see both of these items with brown and white ribbon in the photos.
-stamped plates: I have gotten so many compliments on plate stamping I've done in the past. Important note before you start... you want this to be food safe so make sure to follow the directions. You wouldn't want anyone making you eat regular ink without knowing right?! First you will need a couple of supplies. An un-inked stamp pad and gel food color and any rubber stamp that hasn't touched regular ink - Again, food safe! Start by soaking the pad with the food color. You don't need to use all the food color, but just make sure you are completely soaking the pad. I usually use a table knife to spread the color all around. You're now ready to go. Ok, here comes the tricky part. Put on your patient pants because this can be trying at times. When stamping make sure to stamp STRAIGHT down and back up again. Since plates are much slicker than paper, it has a tendency to smudge. When this happens I just wipe off the plate with a damp paper towel, dry it and try again. And in some cases, again and again. Stick with it because once you're all done you'll really get a great party detail. I always get compliments on this project. Once I did an old pram stroller stamp for a baby shower I was hosting and one of the guests asked me "where in the world did you find baby stroller plates?" She had no idea they were temporary images. Once food, especially wet food, touches the image it will begin to smear. I am planning on doing a tutorial on this process soon. Stay tuned!
Just like I use the wonderful web for constant inspiration, I want to provide you all the links of what I looked at for ideas while putting this party together. They are all adorable and great parties. And if you ever do a milk and cookies party, please share it with me. I would LOVE to see your photos.
Inspiration from here and here and here.


149 comments:
Post a Comment