xmas in july :: christmas card

It's the 31st of July already!?  For my final day in the Christmas in July series, I will share my favorite Christmas card we have ever done.  We used the string closures you find on large business envelopes as inspiration.  We made them using mini grommets to fasten on little red circles that we cut out. (Yes, very labor intensive!)  Then we used silver string that made the shape of a star when you closed the card.  I just love this card!!!

For the inside, we took pictures of each of us holding a large number cut-out that we made.  Our daughter was 20 months old at the time, so getting her and the animals to cooperate was no small task.  Speaking of my daughter, don't you just love her little wool knickers!?  They were a red and white houndstooth material.  So cute!  We put a little Santa hat on her, too and she looked so festive. 

And finally, on the opposite side, I used a white ink pen to write our names on.  Since you could see the holes from the grommets, I incorporated them into our names.  The "o" in Jeromy (I know, it's spelled weird!), the bottom loop in "a" for my name and the top loop in "e" for Ella's name.  It worked out beautifully.  I don't know what we would have done if we didn't have the right letters??

I love sending handmade cards each year.  We get so many compliments and our friends tell us they wait with anticipation each year to see what we are going to do.  They take a lot of time, but sending something that is well received is very rewarding.  And since I save one each year, it gives our family something fun to look back at for great memories.

So, to wrap up this Christmas in July series...  First of all, I hope you liked it. I hope I have provided you inspiration with plenty of time to prepare.  We all know Christmas sneaks up on us fast each year. 

I am thinking about selling Christmas cards this year.  Anyone interested in me making yours?  If anyone is interested in any of the designs you've seen, let me know.  I will book up quick, so get your orders in soon.    Email me with any questions or orders - apowers.apartystyle@gmail.com

Okay, now a complete turn away from Christmas.  July 31st is an important date in my life.  Eleven years ago today, I married my high school sweetheart.  By the time we got married, we had already been together five years.  It was a wonderful day - albeit HOT.  So this doesn't get too sappy for you guys, I'll tell you a funny story about the heat.  Not that we didn't know it was going to be hot in July in Tulsa, Oklahoma, but we didn't think it would end up being the hottest day of the year!  106 degrees at six o'clock in the evening.  Yikes!  To make matters worse, the limo driver didn't turn the car on until right when we were getting in after the ceremony.  When my husband and I got in, I told him "Get as far away from me as you can!!!!"  I know, so romantic right!?  He was probably thinking 'This is what I just married!'  I was just trying to cool off so I didn't melt - 30 pounds of dress and 30 pounds of make-up don't mix well with hundred plus temps.  Anyway, I love you, J and can't wait for the rest of our lives together.  I can't believe it has already been eleven years.  Time flies when you're having fun I guess!

xmas in july :: decorations

Okay, warning this is a long post - Sorry! I just wrote it and had to come back up here and warn you. I should have broken this up in separate posts along the way, but I wanted to get it all in before the end of my Christmas in July series.

I briefly mentioned a Christmas decorating job I did last year in a previous post. I'm finally getting around to sharing the pictures I promised. Unfortunately, the pictures just don't do this job/home justice. I always think it's hard to photograph Christmas trees - they never look as good in a picture as they do in real life. I just want to throw that out there before we get started.

I was asked to decorate the entire house - it was so much work, but so much fun! The clients already had two trees, but after a major renovation and addition, they needed 3 more. I got to design, shop and produce all of the new trees as well as the existing ones. I did add a few more little details to the two existing, but the main job was designing the new trees. Along with the five trees, we bought and hung about 30 wreaths, decorated two stairways, hung a hundred feet of ornament garland and decorated the rest of the house with little things here and there. It took 5 of us two and half days to put it all up. (Just a side note, there were also about 5-6 guys outside putting up all the decorations out there. So spectacular! The storage for all this stuff would BLOW your mind.)

The main tree was one of the existing ones. You can see it as you walk in the front door. A very traditional tree for a very traditional living room. Unfortunately, I forgot to take a picture of the music room tree. It is hidden from sight in this first photo, but it was placed right behind that wall next to the piano hence the name "music room tree". Originally, it had more traditional ornaments, but I found a bunch of music related ornaments at Target to put on as well.


For the sunroom, we did a nature inspired tree. Perfect since the sunroom is surrounded with windows and has an indoor/outdoor feel. And since this was the nature tree, more specifically a bird tree, we thought it appropriate that it be a real tree. It smelled divine in that room! The decor included birds, bird houses, nests, berries, and a brown/light blue color scheme for the ornaments and ribbon.


Next up, is the family room tree. This was by far the largest tree. The genesis of the design came from the colors of the room. Several pieces in the room have a very soft tealish-blue color in them. To bring that out, we picked up on that color. Once we were out shopping, we saw that color paired with the green a LOT so we ran with it!

The mantel has a huge presence in this room and it had to have equally scaled accessories and decorations. While out shopping at my favorite store Target, I just happened to find over sized ornaments serendipitously in our color scheme. Yay! And matching stockings to boot! It is definitely a more modern look, but once my clients' kids got a peek at them, they begged to keep them. The garland was from Pottery Barn and came with the gold and green ornaments already attached. To make it match perfectly with our room and overall scheme, we added the blue ornaments.

Once the mantel was in order, we started selecting decor for the large tree. Knowing our color scheme, we set out to find some fun and unique decorations. I saw an ornament with peacock feathers on it and that was it!!! Those feathers have the blue and green iridescent colors too! So I bought several peacock inspired ornaments and decorations. I also bought huge (12-14" diameter) flowers in various colors to take up space on such a large tree. Lots of details for you to discover, but one I want to point out is the tree skirt. With such an unusual color scheme for a Christmas tree, it was a bit of a challenge to find the perfect skirt. I bought several and took them on site to try them out. Some didn't make the cut at all, but others had potential. The large gold one was okay, but just kind of boring. The bright teal one was too small for the size of the tree, but put those two together and we had the answer!


Now to my favorite tree of this whole job - all six feet of him! It doesn't have to be a huge tree to be fantastic. My clients have a 1950's themed diner room in their house. Black and white checkered floor, red vinyl booths and vintage Formica tables. It's so fun! So, I told them that we needed to do a 50's themed tree in there! They agreed. I thought decoration in that room was important especially since that was where the bar was going to be set up during their huge Christmas party (300+ guests).

This tree was very economical too. The tree itself was from Wal-Mart. The black tree's are SO in right now. They were flying off the shelves and I barely got all the ones bought that I needed. I even bought one for myself. So many people think it sounds too morbid for Christmas time, but I think they look absolutely beautiful with white lights and gold accents. But anyway, back to the 50's tree. I found old school bubble lights, Elvis ornaments, disco balls and Coca-cola ornaments all pretty reasonably priced. I also found old little records at my local Goodwill store for 50 cents each!!! Just perfect! But my absolute favorite element of this tree was the tree skirt. Now, I always try to give credit where credit is due and my hubby gets all the credit on this idea. 50's themed tree skirt = poodle skirt!!! Isn't that ingenious!? So I made a red poodle skirt to match the color scheme and it ended up being the hit of the tree. Since a poodle skirt is always full and fluffy, I added waded up newspaper balls underneath. And I've always been a sucker for ball fringe. If you ever want me to buy something, just put ball fringe on it and I'll get my wallet out! Doesn't it look so cute here!? And ball fringe is so 1950's, too! I still get tickled when I think about this tree.


And lastly, this was just too pretty not to share. This was not in my scope, but one of my client's family members decorates their outdoor pots for them for the season. She just goes to a florist shop and gets greenery and makes the magic herself. Didn't she do a great job!? Wish she could come to my house and do my pots!


xmas in july :: gifts

Every year I make our friends and neighbors a little gift during the holiday season. Last year I made homemade Kahlua. It is really easy to make, just be warned it can get a little costly depending on how many you have to give. I made gallons of this stuff.  My house smelled so good while I was "cooking" it.

Unfortunately, I forgot to take a picture of the finish product, but you can see the filled bottles below. I made a couple of cute little tags that I tied on with red and white baker's twine. One tag said "Homemade Kahlua Happy Holidays from the Powers Family". And the other tag was a cocktail recipe using the Kahlua.  To finish it off, I added a red origami ornament.  It really added to the presentation and made them look festive.

For those of you avid readers, do you recognize the bottles? They were left over from my daughter's milk and cookies party. I bought them at Ikea for a couple of bucks.


For any of you interested in making this, make sure you plan ahead. You have to make the Kahlua and then let is set for six weeks. I made mine in the middle of November, so they would be ready to give by Christmas and the recipients could have a drink right away.

Homemade Kahlua:
2 cups hot water
2 cups sugar
1 tablespoon instant coffee
1 tablespoon vanilla
2 cups vodka
1/2 cup good brandy

In a pan on low to medium heat combine sugar, coffee, vanilla and water. Stir until sugar is completely dissolved. Set aside until completely cool then add vodka and brandy. Be sure it is completely cool or some of the alcohol WILL evaporate. Funnel into bottles and let set for six weeks.

**In other news, I am a guest blogger over at Become.com today!  Go check it out here.  I was given an "Editor's Pick Award" from them awhile back, which allowed me to guest blog today.  Thanks for the wonderful opportunity Emma and welcome to any new readers from Become's Baby Blog!

xmas in july :: christmas card

Before motherhood and event planning, I was a landscape architect.  The firm I worked for collaborated with an architecture firm out of New York City, Butler Rogers Baskett, on a few projects.  Not only are they are great firm, but they also win the best company Christmas card I have ever seen!  I loved it so much that I have saved it for years.  It's a replica of a sheet of stamps - remember those? 

They created it by having all the employees pose with Christmas props like candy canes and snowmen in front of colorful backdrops.  It was sent in a cellophane package with a cardboard backing, just like the old stamp sheets.  I just think it is so creative and oh-so-fun!  Notice the funny filler spots, too like Ebenser Scrooge.  The year (03) replaces the usual amount and the holiday words mimic a stamp design.  I hope I have the opportunity to use this great idea someday! 


xmas in july :: christmas card

I have yet another Powers Christmas card for you.  We're going back a few years here - our first Christmas with a baby!  (Babies and their first Christmas - is there anything better!?)  We used her little footprint and dubbed it "prints" of peace.


We dipped her foot in white acrylic paint and then pressed it on the red paper. To give it a little more definition, we traced her footprint with a white ink pen. I also wrote her name and age next to it.  We then printed a short blurb on vellum paper and laid that over the print. We wrapped it in peppermint inspired paper leaving our names and "prints" of peace showing.  Covering the wording made for a better presentation and it also made the reader remove it to see the footprint better.  Finally, we secured it all with a cute little paperclip and Viola!  

xmas in july :: my wish list

I've recently seen lots of fun things I want. So, since today is the 25th and we are exactly five months out from Christmas (yikes!) I thought I'd share some of my wish list. (Hint, hint hubby!) Maybe you guys would like to add them to your wish list, too.

During these dog days of summer, wouldn't a picnic basket come in handy!? We go to weekly outdoor concerts during the summer, but we always look like the Clampett's carrying everything in trash sacks.  Not really, but I would love to have a cute little basket to carry it all in. Check out this beauty. Modern, yet functional and full of all the necessary items - plates, utensils, glasses, bottle opener, s & p shakers, etc. Available here, but be warned, it's pretty pricey.


Being more realistic financially, this classic one from Crate and Barrel would be perfect too.


My next wish list item is personal stationery. As much as I deal with paper and correspondence, you would think I would have some. I give this as a gift quite a bit and would love to be on the receiving end of it this year. Isn't this set gorgeous!? So crisp and clean. Available here.  


I'm sure you all already know about Bakerella's upcoming book release and I'm sure you are as excited as me. Last I heard, it would be out in September - a little earlier than first expected. Can't wait!!! I have it here on my Christmas wish list, but not sure if I'll be able to wait that long???  You can pre-order through Amazon here.
Next up, a perfect little item for a stocking stuffer - The iplunge! So cute, so funny and so practical. I want one and will probably be stuffing some stockings myself with these little guys. Find them here.

xmas in july :: traditions


One of our family traditions at Christmas time is to count down the last 12 days with books. As the gifts start to pile up around the tree, our girls have a real hard time keeping their hands off! So they love this little tradition because it gives them a chance to dig in. We wrap twelve Christmas books and put them in a big gift bag. Each night before bed, they get to take turns picking a "gift" from the bag and unwrapping it. We read the book as a family and it really builds anticipation for the big day.

As parents we love the tradition because it gives us a chance to spend time with the girls and it is free! Well, I guess the books cost something in the beginning, but I'm sure most of you already have Christmas books on hand. Once you have them, it's free every year there after.

Every year, we specifically set aside 'Twas the Night Before Christmas to read on Christmas eve. Nothing like talking about Santa hours before he's going to visit our house! We read the book and then set out his decorated sugar cookies, which we make and frost earlier in the day. The girls go to bed with images of "sugar plumes dancing in their heads".

While we are on the subject of Santa, I'll share a couple more traditions we do. These fun traditions really add to the magic of Santa. We put out "reindeer food" in our yard to make sure Rudolph and the rest of the gang stop at our house. We give our daughters a ziplock bag of oatmeal and glitter mixed together. I make little tags that say:
Sprinkle on the lawn at night,
The moon will make it sparkle bright.
As Santa's reindeer fly and roam,
This will guide them to your home!

You can find several examples on the web; just search "reindeer food". You can make extra to give as gifts. Kids just LOVE recieving them! Now remember, you have to sweep it up so the kids don't see it and really think the reindeer ate it.

Another fun trick... We all know Santa and his sleigh land on our roofs right!? Well, how about laying an extra shingle out in the yard. Then in the morning, "stumble" upon it with your kids. Say something like "Oh no, the reindeer knocked off one of the shingles from the roof!"

To really bring the Santa magic up a notch, stick a tuft of white fur onto your fireplace bricks. Say "Poor Santa, he ripped his clothes on our fireplace while he was coming down the chimney. I'm sure Mrs. Claus will sew it back together."

And lastly, don't forget to eat the cookies the kids left out for Santa. That's never a problem in our house. I've usually got that "taken care of" before the kids are actually even asleep!!! Come on, no judging. They have frosting on them - what did you expect me to do? Leave them there for a hour!? Impossible for a frosting addict!

xmas in july :: display of trees

Last Christmas season I was invited to an annual fundraising event for The Connecticut Ronald McDonald House called "Trees of Hope". The event includes hundreds of theme decorated trees. Attendees "voted" for their favorites by putting donations in that tree's bucket. Not only did I vote for several, but I also took pictures of my favorites. I am always trying to stock pile good decorating ideas for my clients. I have one client who asked me to decorate his whole house for Christmas last year - it was no small job as it involved hundreds of wreaths, miles of garland, staircases galore and 5 huge trees. I'll show you those pictures soon. Anyway, back to the fundraiser trees. Check these out. I noted my favorite ideas from each.

This tree was a Paris inspired tree. I love the Eiffel Tower topper and the working toy train that went around and around. Other details included jewelry and anything fashion related.


Next up, a tree decorated with all things golf related. I especially loved the tufts of grass at the base and the gopher club cover they put on top. So Caddy Shack! I know the picture is blurry, but it's the only one I had of the topper and I really wanted you guys to see it.


I just loved this next tree! Not that I'm an avid Red Sox fan, but you could do this with any favorite team. As you can see from the sign, they named this tree "Even Santa Prefers the Red Sox". Love that! Being in Connecticut, we are caught right in the middle of a legendary rivalry - Yankees vs. Red Sox. I will have some friends mad at me for even sharing this Red Sox beauty with you, yet other friends will be upset I haven't given my complete support to the Red Sox tree. Let's just call me Switzerland - neutral territory! Some of my favorite elements are the baseball cards, the mini batting helmets and the "believe" signs. Anyone that follows baseball knows that is a word synonymous with Red Sox nation. I also love that they picked a white tree (which are huge right now) to add to the color scheme. The ornaments really stand out off the white. And in an effort to be equal, white would be great for a Yankees tree too!


There are a couple things from this next tree that I really like. First of all, the colors are just scrumptious! So different from other ordinary Christmas colors and I love it! I also can't get enough of the paper doll garland. Wouldn't this be great for say an elementary school tree!? One doll per student... Any teachers out there?


One prevalent trend was using branches in the topper displays. I do the same in a lot of my tree designs. It adds visual height to the tree and gives a touch of nature. Here are a few examples I saw. This first one sprayed the branches white and I just love it! I also love the glittered hydrangeas tucked in there - so classy!


This tree was donated by a dentist's office - can you tell!? Decorated with all sorts of candy, but also with toothbrushes, toothpaste, floss and Listerine. Very cute!


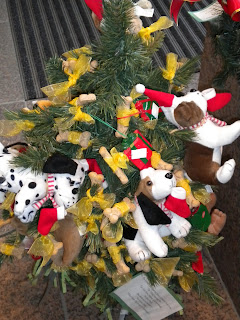
Can't forget the pets! A local animal shelter donated this tree. Don't you just love the dog bones tied on!? Very cute and creative. I think it would be perfect in a veterinarian office.


And finally, another trend I saw repeated several times was using a boas like garland in and around the tree. It really adds texture and glamour. One tree was from a cosmetics company. See how they tied on different make-up samples. And the other little tree was "pretty in pink".


Hope you find something inspiring to add to your tree this year!

xmas in july :: ornament display

While I was at the National Stationery Show earlier this year, I saw a clever way to display ornaments. I thought it was functional yet modern. Since I have so many ornaments that I can't even display them all, I'm definitely thinking this could be an option for me.


A pretty unique display using only dowels and spray paint! If I make one of these (which I'm really considering), I will be sure to post the tutorial.

xmas in july :: christmas card

Yet another Powers Christmas card... As you can, see we used a play on words with a "peace" theme. See the puzzle "piece". Enjoy!


We bought several packages of the postcard sized puzzle mailers you can get at Michael's, broke them all apart and covered each piece in red glitter. We then traced and cut the matching shape puzzle piece (there was several different shapes in each package) out of the front cover so the picture would show. Attached the matching puzzle piece with an envelope closure and bakers twine. And finally, we stamped the "peace." on with little alphabet stamps to finish it all off.

As I'm writing this, I'm realizing you could buy a cheap puzzle at a tag sale or goodwill and probably save some money - Darn! Why didn't I think of that!? Since we completely covered the pieces (a time consuming task by the way) it doesn't matter what's on them.

More Christms cards still to come...
Next previous home
Related Posts Plugin for WordPress, Blogger...